Showing posts with label Mains. Show all posts

Saturday, September 29

Oyakodon

On the menu tonight was oyakodon. Oyakodon is essentially a japanese chicken and egg rice bowl. A lot of blogs explain that it literally means "parent (oya) and child (ko)", because both the chicken (parent) and egg (child) are represented in this dish.

Oyakodon is an extremely easy one dish meal to prepare and it took me a little under 30 minutes from preparation to serving dinner, apart from cooking the rice. It's a wonderful fast-cooking dish to prepare if you have nothing but eggs and chicken in the fridge, and you want a nice filling feeling in your tummy.
This is my second favourite donburi dish next to katsu don. The preparation style is pretty much the same, except the chicken meat is not deep fried in this case. Recipe is adapted from justonecookbook.
Ingredients: (for 3 portions)
6 fillets of chicken meat
3 eggs, lightly beaten
2 onions, sliced thinly or cut into rings
Seasoned seaweed

Seasonings:
2/3 cup dashi stock (Japanese soup stock made of dried bonito flakes and dried kelp)
3 Tbsp mirin (Japanese rice wine)
1 tsp soy sauce
2 Tbsp sugar
1 Tbsp sake (optional)

Directions:
1. Cut the chicken meat into bite sizes.
2. In a frying pan, heat the seasoning sauce and bring to boil. Spread the onion into the pan until the onions look soft.
3. Place chicken into the pan, distributed evenly around. Cover the frying pan with a lid and keep the heat on high until the liquid boils. Remove the scum if any.
4. Lower heat and cook until chicken is cook.You can lightly stir the chicken and onion while cooking.
5. Slowly pour the eggs into the pan. Make sure that the eggs are dispersed evenly around. When the egg is about 80% cooked, turn off the heat.
6. Transfer the chicken and egg mixture onto a bowl filled with steamed rice. Garnish with seasoned seaweed. I served my oyakodon with homemade miso soup.

Friday, September 28

Chicken Katsu Don

Mum says I'm like my dad in many ways. Especially when it comes to food. When a certain food comes to my mind and I crave it, I tend to do everything I can to get my hands on it. Dad tells me that he foresees me flying between continents in the future, all for the sake of food. I might need to save up a lot of money to be able to do that! :p

I was chatting with my friend Karen in Singapore this morning, and one of the things we talked about was how cool it would be if we both lived in the same city and we could have dinner parties and cookouts. From there, it led to what's cooking in our kitchen this weekend and we both decided we'd try cooking a donburi (rice bowl) dish.

I was planning on making oyakodon during the weekend, but as it is, I happened to come home early from work today with katsu don on my mind and since mum hadn't started on dinner yet, it was perfect timing for me to take over. A quick trip to Cold Storage and Tesco for my ingredients and then I'm on my way to cooking my katsu don (recipe adapted from Nami's awesome blog).
Ingredients: (for 3 portions)
6 fillets of chicken meat
Salt
Freshly ground black pepper
1/4 cups all purpose flour
1 egg
1 cup Panko breadcrumbs
Oil for deep frying
2 onions, sliced thinly or cut into rings
2 eggs, lightly beaten
Seasoned seaweed
Spring onions

Seasonings:
2/3 cup dashi stock (Japanese soup stock made of dried bonito flakes and dried kelp)
1 1/2 Tbsp mirin (Japanese rice wine)
1 tsp soy sauce
1 tsp sugar
1 1/2 Tbsp sake (optional)

Directions:
1. Season chicken fillets with salt and pepper, then dredge in flour, eggs and panko.
2. Deep fry the chicken meat until golden brown, then drain excess oil away. Set aside.
3. Prepare seasonings and stir to combine well. Pour the seasonings into a frying pan and bring to a boil. Add in the onions, lower heat and let the mixture simmer until the onions look soft.
4. Put the chicken katsu into the pan, and turn up the heat to a medium high. Pour egg evenly into the pan.
5. When the egg is half cooked, turn off the heat.
6. Serve rice in a bowl, with the chicken and egg mixture. Garnish with seasoned seaweed and spring onions. I served my katsu on brown rice because that's what we eat at home.
Lessons learned from my donburi attempt:
1. Turn the heat really high just prior to adding in the egg so that the egg cooks fast and the katsu remains crispy. I was a little too slow so my fried chicken ended up losing its crispiness (what a waste of my deep frying effort because I really dislike getting burnt by spitting oil).
2. My katsu seemed like a mess when arranged on the rice. Next time I must remember to slice up the meat and arrange it nicely in the pan before I pour the egg in. That way, I'll be able to scoop up the meat and egg together and put it straight on top of the rice instead of doing it the other way around and end up with a yummy but not-so-aesthetic-looking piece of meat! :p

Sunday, July 22

Sambal brinjal

I only learnt how to eat brinjals a few years back. When I was little, the only thing that I would eat was beans. All sorts of beans - long beans, french beans, green peas and basically any kind of legumes. Leafy vegetables was a big no and same goes for the unconventional types like brinjals. Now I'm a big fan of brinjals ... very ironic indeed.

Anyhow, the method to cook sambal brinjals is very similar to sambal okra. It's amazing how a simple method can be reused for many kinds of dishes. Anything simple wins my vote!
Ingredients:
One brinjal, sliced in little pieces. Make sure the core is removed.
Fresh chilli, unseeded
Shallots
Dried shrimp
1 tsp Belacan powder
Cooking oil
Some water
Soy sauce to taste 
Salt and a little bit of turmeric (kunyit powder) for seasoning

Directions:
1. Season the brinjals in salt and turmeric powder. Then pan fry the brinjals until they are cooked and soft.
2. Pound the chilli, shallots and dried shrimp together until it becomes a paste. Add in the belacan powder and mix.
3. Heat the wok and add the cooking oil. Saute the paste until fragrant.
4. Add in the brinjals. Stir fry for a few minutes until the okra becomes sticky and cooked.
5. Add some soy sauce to taste. Dish out and serve hot.

Sunday, July 15

Sambal okra

I'm not a big vege eater, but there are a few types of vegetables that I absolutely adore and could eat them everyday without fail. One of them is okra, or ladies fingers. I love my okra cooked any way, but my favourite is when it is cooked with sambal.
It is extremely easy to cook this dish but I can never seem to get the hang of 'agak-agak'-ing (estimating) my ingredients. But that's how it is with local cooking, so that's one thing that I need to get used to. In a nutshell, here's how to cook this yummy dish. You'll have to 'guesstimate' the amount needed for the ingredients. :p

Ingredients:
Fresh okra, sliced diagonally 
Fresh chilli, unseeded
Shallots
Dried shrimp
1 tsp Belacan powder
Cooking oil
Some water
Soy sauce to taste 

Directions:
1. Pound the chilli, shallots and dried shrimp together until it becomes a paste. Add in the belacan powder and mix.
2. Heat the wok and add the cooking oil. Saute the paste until fragrant.
3. Add in the okra. Stir fry for a few minutes until the okra becomes sticky and cooked. Add in some water while stirfrying.
4. Add some soy sauce to taste. Dish out and serve hot.

Today, mum and I cooked up a very Malaysian feast for lunch. Nasi lemak, served with my sambal okra, peanuts and sambal anchovies, fried fish and fried turmeric chicken, and hard boiled eggs with raw cucumber on the side. So good!

Wednesday, June 20

Happy Dumpling Festival!

Every year, I make dumplings with my mum. It's a wonderful bonding experience and it is lots of fun cooking with mum. No recipes today but just some pictures to share. I wish everyone could try out our delicious dumplings! :)

Wednesday, April 11

Chicken cordon bleu with mushroom gravy

Yay for holidays!
I haven't been cooking in a while but I had a good reason to because my bestie came over to spend the afternoon with me today. As usual, my side of the deal is to prepare lunch.

I decided that I wanted something hearty and sinful. But the health freak in me was keeping me in check. As a compromise, I whipped up a hearty chicken cordon bleu with mushroom gravy and boiled vegetables on the side. Vegetables are healthy, right? :) And yes, I made sure my meat was lean and skinless.
Cordon bleu is one of my guilty pleasures because of all the ham and gooey cheese. It's also one of my favourites from my regular western food shop just around the corner from where I live.
It's my first time cooking this and to my surprise, it wasn't that hard to prepare and it turned out very well indeed.
Ingredients:
2 pieces boneless skinless chicken breast meat
2 slices deli ham
2 slices cheddar cheese
1/2 cup bread crumbs
1 tsp tarragon
2 Tbsp cooking oil
A few toothpicks

For the sauce:
Olive oil
Salt and pepper
5 cloves garlic, chopped
1 yellow onion, chopped
5 brown mushroom, thinly sliced
1/2 tsp tarragon
1/2 can mushroom soup (okay I cheated a little :p)
1 Tbsp fresh parsley, chopped

Directions:
1. Wash the chicken breast meat well. Begin by slicing a pocket into the chicken breasts. Fill up with ham and cheese. I sliced up the ham and cheese. Close up the meat pocket with toothpicks.
2. Mix the breadcrumbs and tarragon in a bowl, and coat the chicken meat.
3. Heat up oil on medium heat and pop the chicken meat in, cook well on both sides. Then remove and pop into the oven heated to 180C for about 20 minutes.
4. While meat is in the oven, saute the garlic, onions, mushroom and tarragon. Once well cooked, add in the mushroom soup and some water. Make sure not to add too much water else the gravy will be too watery.
Let the sauce simmer and thicken.
5. Remove the chicken from the oven. Make sure the toothpicks are removed. Pour gravy over chicken, sprinkle fresh parsley over, and serve dish with some sides.

Sunday, February 5

Roti jala

Every once in a blue moon, I'll have a craving for roti jala. And not just any store bought ones, but instead I crave for the homemade ones.
The lunch menu today was roti jala, served with curry chicken kapitan. The recipe that I used today was an adaptation from here.
Ingredients: 
250g flour
2 eggs, lightly beaten

Mixture (A):
2 cups santan
1 cup water
1/2 tsp salt
A pinch of kunyit (turmeric) powder, or yellow colouring

Directions:
1. Sift flour into a mixing bowl. Stir in eggs. Add (A) gradually and beat until batter is smooth. Strain batter.
2. Pour batter into a roti jala cup with four to five funnels. Heat a nonstick frying pan over low heat. Grease lightly. Move the roti jala cup in a circular motion over the nonstick pan to form a lacy pattern.
3. When the pancake is set, turn it over onto a plate. Fold the pancake into quarters or roll up and stack neatly on a plate. Serve with curry chicken, rendang or any curry dish.

Saturday, January 14

Chicken and mushroom quesadilla

Quesadillas make me think about Texas. A LOT.
Quesadillas are one of my favourite Tex-mex food of all time (I love them even more than baby back ribs and beef briskets), unrivalled only by crispy tacos. Thinking about them makes me miss my neighbourhood cafe in Austin - Magnolia cafe, which I think serves the best quesadillas around.

Today I had the honour of cooking lunch for my bestie who came to spend an afternoon with me. And since she likes anything cheese, eggs and mushroom, the thing that came to my mind was quesadillas. They are easy to prepare, healthy and nutritious, and they are super yummy. And I must add that it helped that I was craving some Tex-mex too.

Quesadillas (queso in Spanish means cheese) are essentially toasted tortillas with melted cheese inside. I added grilled chicken, sauteed onions and mushroom, and chopped tomatoes in mine. You can easily switch to whatever fillings to suit your taste or you can even use whatever ingredients that are available in your fridge. Ideally quesadillas taste best served with sour cream, guacamole or even salsa, but unfortunately I didn't have any at the moment.
Ingredients:
One pack flour tortillas
2 large onions, finely sliced
Sliced mushroom (I used 5 baby bellas)
1 fillet chicken breast meat
2 tomatoes, diced
Olive oil
Grated cheddar and mozzarella, but basically any type of cheese would taste just as good
Salt and pepper

Directions:
1. Wash the chicken fillet well and blot dry with paper towels. Marinade with salt and pepper. Grill on medium heat until well cooked. Transfer the chicken to the cutting board and chop into tiny bite-sized cubes.
2. Saute the onions and mushrooms until the onions are somewhat caramelized and the mushroom is well cooked.
3. Heat up a frying pan to medium high heat and place one tortilla on the pan. Flip the tortilla over a few times until it is warm on both sides.
4. Sprinkle a handful of grated cheese over half of the tortilla, followed by the onions and mushroom, chicken pieces and tomatoes, and then sprinkle a little bit more grated cheese on top. Be careful not to layer too much ingredients too thickly because you don't want the filling to overflow.
5. Fold the tortilla into half, just like a sandwich. Use a frying pan to press the top of the folded tortilla flat. Flip it over to brown the other side. Be careful not too leave it too long on each side because the tortillas burn easily. 
6. Remove from pan and cut into wedges. Serve with sour cream, guacamole and salsa.

Sunday, January 8

Hainanese chicken rice

I'm not the best cook around and I know many other people who are better cooks than I am (some are men to boot, which I have to admit makes me feel rather embarrassed). In the quest to be less of a klutz in the kitchen and also as my resolution this year, I'm going to learn how to cook proper dishes instead of the usual cakes that I like to bake - You know, the kind of food that makes a well-balanced meal instead of just being sweets and desserts.

I love a good chicken rice. Who doesn't, right? It's one of the first few dishes that come to my mind when I think of a one-dish rice meal.
The menu for Sunday dinner tonight was Hainanese chicken rice, served with soup. Okay I admit that I much prefer the roasted version instead of this one, but it's still good fun to cook and even more fun to see my family enjoying the food I cook. :)
Ingredients:
Preparing the chicken:
3 big drumsticks
1 tsp salt
Sliced cucumbers and tomatoes, and spring onions for garnishing
Soy sauce

Preparing the rice:
1 1/2 cups long-grained rice
2 Tbsp cooking oil
10g finely sliced young ginger
10g garlic, chopped
10g shallots, chopped
1/2 Tbsp salt
1/2 Tbsp chicken stock granule
Chicken stock
5 blades pandan leaf, knotted

Directions:
Preparing the chicken:
1. Rinse the chicken and pat dry. Rub salt all over the chicken skin to season it. Let it marinade for about 15 minutes.
2. Put the chicken into a pot of boiling water, cover and bring to boil.
3. Remove the pot from heat and leave the chicken to soak in the water for about 45 minutes. Dish up the chicken and soak it in cool water immediately for about 20 minutes until cool. Plunging the chicken into cold water stops the cooking process immediately and it makes the chicken meat tighter and more firm.
Remember not to throw away the chicken stock because you will need it to cook the rice.
4. Remove and drain the chicken from the water, and chop up the chicken into pieces.
5. Garnish with cucumbers, tomatoes and spring onions. Add a dash of soy sauce for some taste.
Preparing the rice:
1. Rinse the rice and drain well.
2. Saute the garlic, ginger and shallots until fragrant. Add in the rice and the salt and chicken stock granule, continue stir-frying until the rice looks almost translucent.
3. Transfer the rice into the rice cooker. Add in the chicken stock (that was used to boil the chicken) and pandan leaves, cook until done.
I served my chicken rice with salted mustard leave (kiam chye) tofu soup. I like that the salty and sweet nature of this soup compliments any rice dish really well.

Monday, December 26

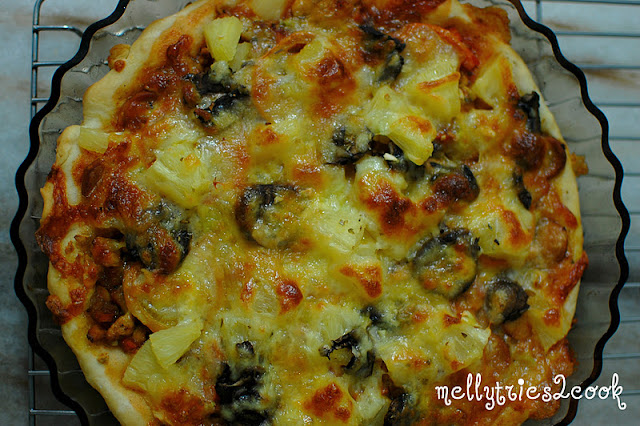
Chicken pizza with mushroom and pineapple toppings

Christmas day dinner with the family resulted in me baking all afternoon. I love cooking for my family and seeing them enjoy the food is extremely satisfactory.

The main on my menu today was pizza. It's one of the easiest one-dish meal to make, you can bake in bulk, and it's yummy comfort food that you can eat for days. Pizza toppings are extremely fun to prepare because it gives the cook the freedom of adding in whatever comes to mind, and the result will always still taste good. I love that I live a very short distance away from Tesco that I can impulsively plan menus and pop in to get my ingredients. And when Tesco runs out of yeast, there's always Cold Storage nearby as a backup plan. 
Ingredients:
The dough:
1/2 cup warm water
1 sachet of active dry yeast
1/2 tsp salt
1 tsp sugar
1/4 tsp oregano
2 cups sifted plain flour

Toppings:
4 cloves garlic, chopped
2 yellow onions, diced finely
2 large carrots, diced finely
6 large tomatoes, sliced finely
Portabello mushrooms
1 can sliced pineapples
2 fillets of chicken breast meat, cut into bite sized pieces
1 can tomato puree
Oregano for sprinkling over the pizza
Mozzarella and cheddar cheese mixtures, coarsely grated

Directions:
To prepare the dough:
1. Place warm water in a mixing bowl and add in the yeast, salt, sugar and oregano. Stir to dissolve the yeast.
2. Add one cup of flour and blend all the ingredients together with a spoon or mixer until smooth. Stir in the remaining flour then cover with a clean cloth and allow to rest for 10 minutes.
3. Spread dough evenly with oiled spoon over a pizza tray.

To prepare the toppings:
1. Saute half of the chopped garlic and all the onions in about 5 Tbsp oil till fragrant. Add in the tomato puree.
2. Add in the carrots to the pan and continue sauteing until the carrots are tender. Add in the chicken meat and fry till it's cooked. Add salt and pepper to taste.

Assembling the pizza:
1. Cover each dough with a few tablespoons of puree mixture. Layer with mushroom, sliced tomatoes and pineapples. Sprinkle some chopped garlic, add a dash of oregano over the toppings, and sprinkle loads of cheese over the pizza.
2. Bake in 200C oven for 25 minutes until cheese is bubbly.

Saturday, December 17

Chicken pie

Most of the time, I don't plan what to cook and I don't like to wait when I want something done. :) So today while out running errands, I had this 'brilliant' idea to bake mini chicken pies because I remembered that I still had puff pastry in the freezer. I say brilliant because I am super impulsive.Traits of a bad cook, I suppose.

The chicken pie filling is relatively easy to prepare, and it's easier still if you didn't have to make the pastry from scratch. Yeah I'm that lazy, but I'm just trying to simplify some things at hand. Given lots of time, there are plenty of recipes and methods from search engines that teach you how to make flaky crust from scratch. Best of all, the pies can be frozen after baking to be enjoyed at another time so I suppose that will be my dinner one of these days. My ingredients were enough for 20 mini pies.
Ingredients:
5 large potatoes, diced
1 large carrot, diced
1 large yellow onion, diced
1 piece of deboned chicken breast meat, sliced into small bite-sized pieces
Half a clove of garlic, chopped 
1 cup of frozen peas
Salt and freshly ground pepper
1 can of Campbell's mushroom soup
1 box of puff pastry (the one I bought had 40 pieces)
1 egg yolk beaten + some milk (to brush over the pastry)

Directions:
1. Saute the garlic and onions in about 5 Tbsp oil till fragrant.
2. Mix in the potatoes and carrots to the pan and continue sauteing until the potatoes and carrots are tender. Add in a little water while sauteing.
3. Add in the chicken meat into the mixture and fry till it's cooked. Stir in the frozen peas. Add salt and pepper to taste.
4. In a separate pot, cook the mushroom soup as per the directions from the can.
5. Pour the soup into the vegetable mix and let it simmer till the mixture thickens. Remove pot from the stove and let it cool completely. The ready mix should look like thickened clam chowder.
6. Fit in the puff pastry squares into aluminum foil molds. Scoop about 1 1/2 Tbsp mixture into the mold and top with another puff pastry square. Flute the edges of the squares together so that they look nice and pretty.
7. Preheat the oven to 200C. Snip a cross over each individual pie so that the filling is able to expand. Brush the tops of each pie lightly with the beaten egg mixture so that the pies look nice and golden after they are baked. Bake pies for about 20 minutes or until golden brown.
8. Serve immediately.
I served the pies with a cup of hot Lipton tea, and later we had pears and persimmons for dessert. Weird combination I know, but it was indeed a truly delicious meal. And I'm looking forward to defrosting the remaining pies for dinner another night soon.